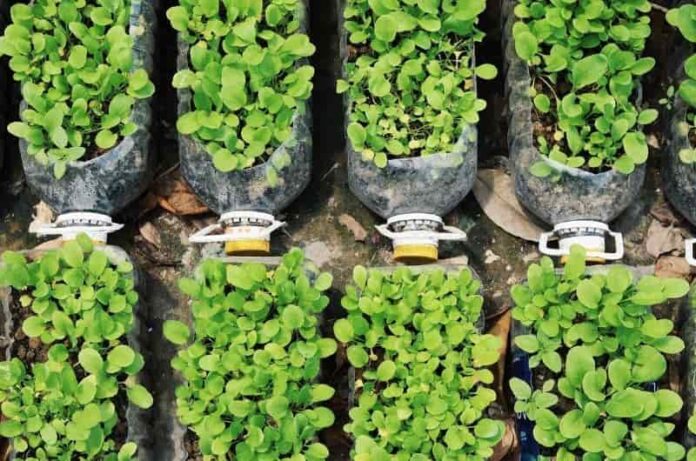
How many of you throw plastic bottles in garbage? Probably all! In a recent survey it was found that around 2.3 million Plastic bottles are thrown away by people every hour. But did you know? You can save these bottles and plant a small ecosystem or garden in it.
Besides creating a garden there are many ways to use used plastic. But one of the best and great techniques to get the most out of plastic bottles or containers is growing an ecosystem in it.
So, let’s study a little deeper!
About Bottle Garden
The process of growing a garden in a small plastic bottle is known as bottle garden. These are small gardens mainly used as a substitute of garden for the homes who have lesser space to create an outdoor garden.
Additionally, these are easy to create and maintain by anyone. These are quite attractive and the best small garden for your home that keeps your summer a little cooler.
How do you make a Bottle garden? Read Easy Steps!
If you are ready to create a bottle garden then first look for the things you will need to create a bottle garden
Ingredients/things you will need
- Plastic bottle, glass or container
- Chopsticks
- Charcoal
- Seeds
- Pebbles
- Soil
- Hole puncher
When you have all ingredients together then move to the steps as given.
Step 1 – Choose the Plastic bottle
It doesn’t matter if you are choosing a plastic bottle or glass for planting your small garden. One should choose a bottle that’s big enough for plants to grow and live healthy. Also, ensure the bottle has a larger opening, as the easier it will be the more you can maintain the garden.
For example: if you are using a 2ltr of plastic bottle, an ideal size for a garden. so make sure to clean the bottle inside and let it dry before the use.
Step 2 – Add Pebbles in the bottle
To make your mini garden more attractive and also to cover the bottom of the bottle, putting pebbles is the best idea. Moreover, pebbles provide space and water to collect in.
Step 3 – Add layer of activated charcoal
The purpose of adding charcoal is removing odor caused by decomposition in the bottle. The charcoal keeps the bottle clean and causes no smell. Usually, you can find activated charcoal in pet stores, as it works best in reducing smell. Furthermore, the further layer of peat moss will hold the water and nutrients that the plant needs to grow.
Step 4 – Grow plants
Now you are in the next step that’s growing plants. Choose the high quality seeds of small indoor plants and plant them in the soil by using chopsticks. However, the tropical vegetarian garden can make the best use of an ideal bottle garden because they perform well in humid conditions.
The suitable plants you can include are:
- Club moss
- Club moss
- Crotons
- Prayer plant
Step 5- Seal the bottle garden
Once you are done with step 4 then water the plant and seal the bottle garden by adding a lid. After that place it near the sunlight, and don’t forget to create a hole because plants need moisture and air. Bottle gardens only require water, so care for your plants and watch them grow.
So, we hope this article has shared all the details you need to grow a bottle garden in your home. So, pick your inspiration and start growing your small garden today.


